-
-
- Kitchen accessories
- Breathalyzers
- Blenders, mixers and planetary robots
- Electric kettles
- Coffee machines and coffee
- Waffle makers
- Frytownice (Air Fryer)
- Ice makers
- Microwaves
- Ovens and stoves
- Pressure cookers
- Soda makers
- Toasters, sandwich makers, electric grills
- Thermoses and thermal mugs
- Kitchen scales
- Irons and steamers
- Heaters
- Air treatment
- Fans and air conditioners
- Vacuum cleaners
-
- Locators
- Warranties and digital licenses
- Consoles and accessories
- Gsm accessories
- Cctv monitoring
- Tablets and e-book readers
- Photography
-
Network equipment
- Voip
- LTE, 5G
- Cables and patch cords
- Rack cabinet accessories
- Olt and ont
- Network accessories
- Wi-Fi / LTE antennas
- Enclosures, splices, boxes
- Rack cabinets
- Fiber optic welders and tools
- Access points
- Switches
- Uchwyty i akcesoria montażowe
- Sfp modules
- Power supply
- Wi-Fi signal boosters
- Routers
- Radio lines
- Powerline
- Cable pulling pilots
- Media converters
- Computers and gaming
- Drones and accessories
- Power supply
- Smart glasses
- Liczarki do pieniędzy
-
- Nasal aspirators
- Inhalers
- Lamps, star projectors
- Pregnancy pillows
- Bottle warmers
- Bottle sterilizers
- Children's thermometers
- Potty chairs and seats
- Lactation massagers
- Children's room
- Toys, games and education
- Bottles, bidons and accessories
- Breast pumps and accessories
- Bathtubs and bathing accessories
- Strollers for children
- Clothing
Cisco RV260 and Cisco SG250X-24 - configuration basics
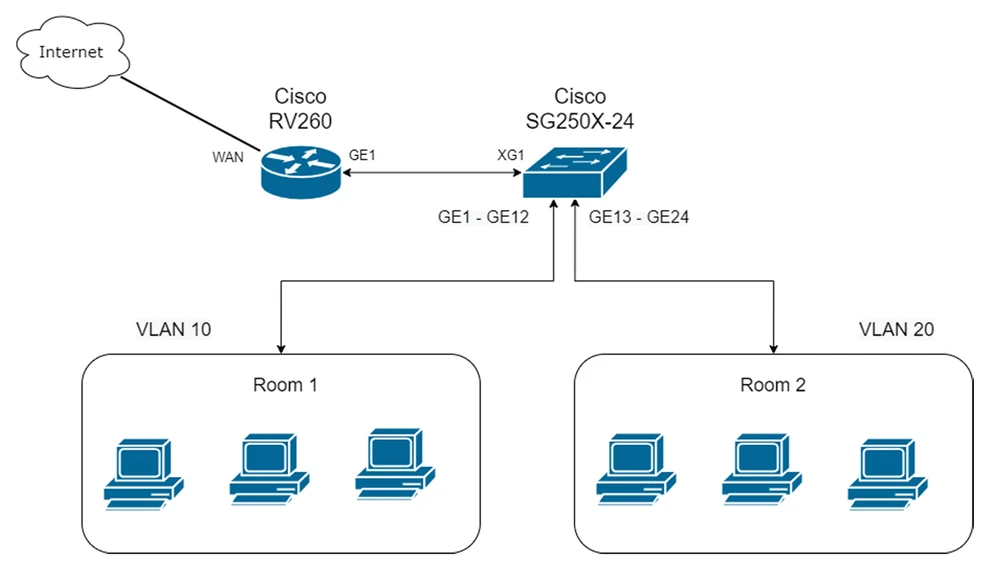
In this tutorial, we will present the basic configuration of Cisco RV260 (router) and Cisco SG250X-24 (switch) devices. On this basis, we will provide access to the Internet service to our customers. All configuration will be done based on the following network topology diagram: two subnets in two VLANs (10 and 20) and simple a configuration of a Cisco router.
Configuring Cisco routers
First, we will start by configuring our Cisco RV260 VPN router. There are two ways to configure it: through the CONSOLE port, using a special RS232-RJ45 cable or through the web interface. The router we will be configuring is designed for small and medium businesses (no SSH or TELNET connections), so we will do the configuration using the web interface.
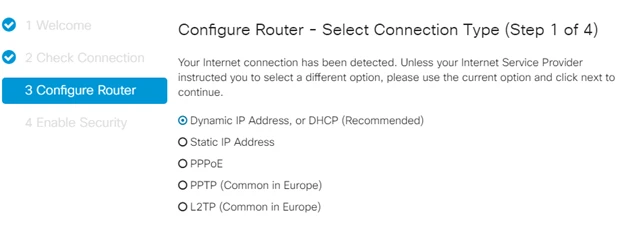
After connecting to the device, our operating system will automatically receive an IP address. Open a browser and type in https://192.168.1.1 and immediately go to the start page of Cisco, where you will make the initial configuration:
After connecting to the device, our operating system will automatically receive an IP address. Open a browser and type in https://192.168.1.1 and immediately go to the start page of Cisco, where you will make the initial configuration:

We configure the WAN port setting, according to our connection to the Internet.
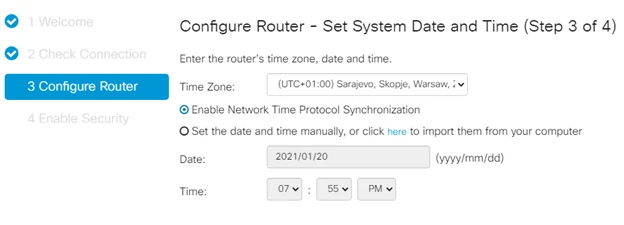
You also need to remember to set an accurate time that matches your time zone and set NTP synchronization. Setting an accurate time will help with future troubleshooting.
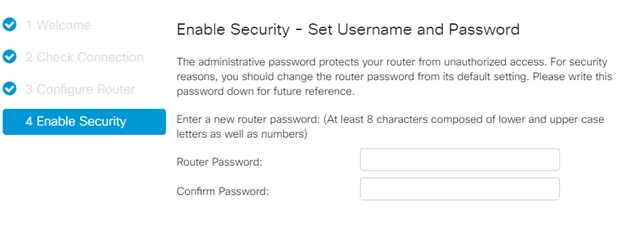
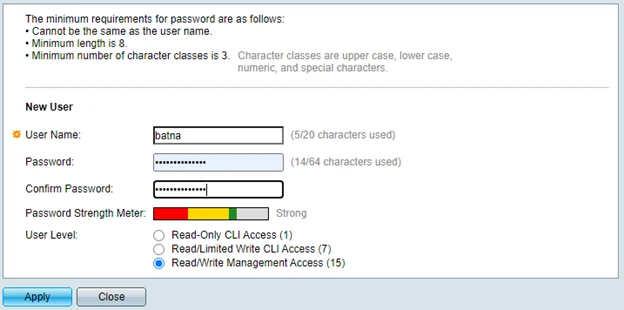
And at the very end, the last item in our settings wizard, concerns the device access password. You should set a complex password (at least 8 characters, with upper and lower case letters, as well as numbers and characters)
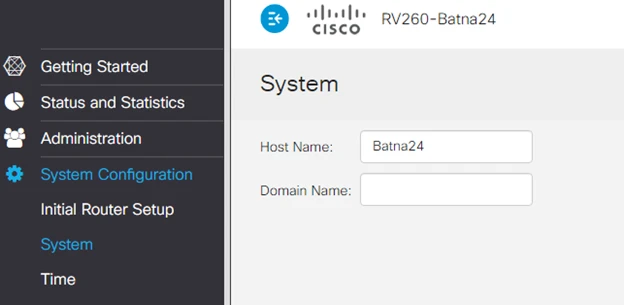
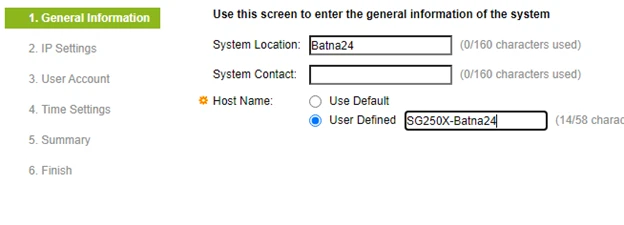
The final point in the basic configuration of our router is to set a name that will help identify our device.
Advanced configuration of a Cisco router
The initial setup is done. Therefore, let's move on to more advanced settings. According to our assumption, we will divide our network into two physical VLAN subnets, and additionally secure our router:
- Room1 (Address: 192.168.10.0/24 VLAN tag: 10)
- Room2 (Address: 192.168.20.0/24 VLAN tag: 20)
- Devices (Address: 10.10.1.0/24 VLAN tag: 100)
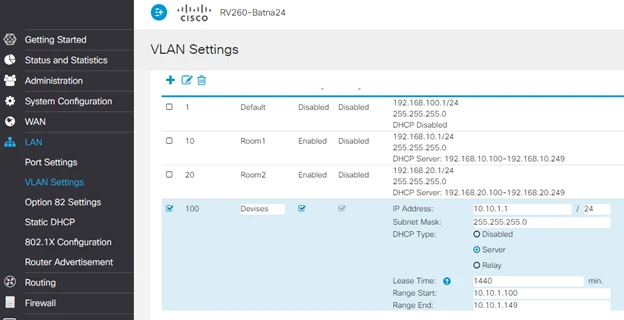
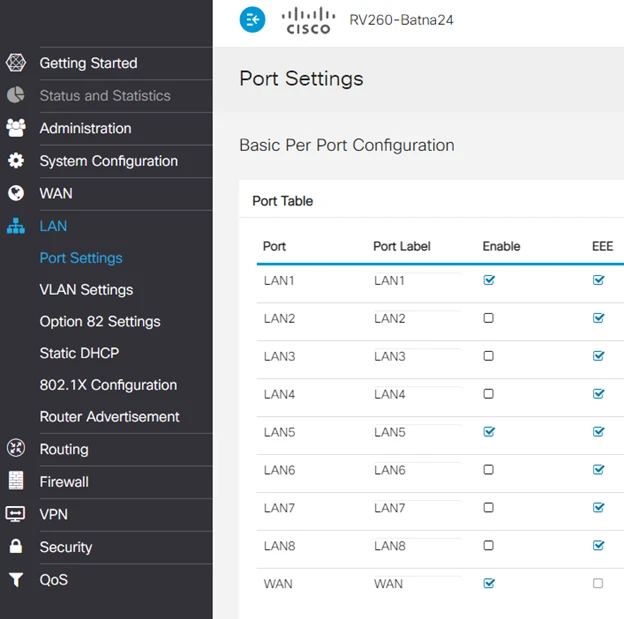
In addition, we set Device Management to Disabled on all VLANs except VLAN 100. This will serve as a hardware protection against intruders. Also, for specific ports, we will define specific VLANs. For the first LAN port, we will define VLAN 10,20,100, and for the fifth LAN port, we will define VLAN 100 Untagged (other VLANs on that port are disabled). Additionally, for security reasons, we will disable all unused ports.

Configuring the Cisco SG250X-24 switch
We've already configured the RV260 router, so now we'll take a look at configuring the Cisco SG250X-24 switch. Since the router was configured via the web interface, we'll configure our switch in a similar manner.
192.168.1.254 is the default address of the Cisco SG250X24 switch. After logging into the device (standard login and password), we create a new user and password. The password should be created according to all security standards (upper and lower case letters, numbers and symbols, at least 8 characters).
192.168.1.254 is the default address of the Cisco SG250X24 switch. After logging into the device (standard login and password), we create a new user and password. The password should be created according to all security standards (upper and lower case letters, numbers and symbols, at least 8 characters).
Next, we use the initial hardware configuration wizard.
And similarly to the router configuration, we set the exact time and synchronization via NTP protocol. This concludes the basic hardware configuration.
Configuring VLANs on the switch
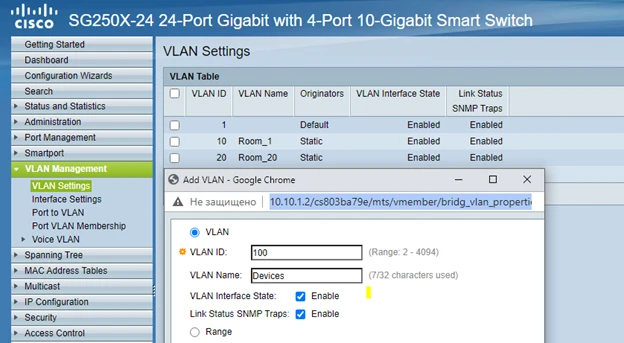
First we create our subnets: VLAN 10, VLAN 20, VLAN 100.
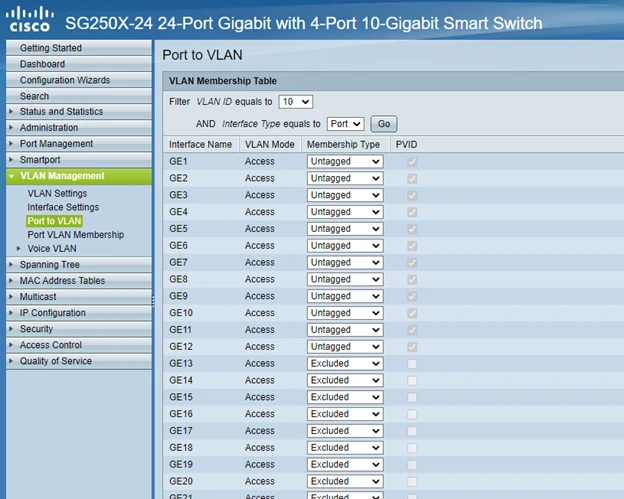
After creating the VLAN, we need to assign the appropriate ports. In our case, ports GE1 - GE12 are dedicated to Room1 and will be in VLAN10. And ports GE13 - GE24 are dedicated to Room2, VLAN20.
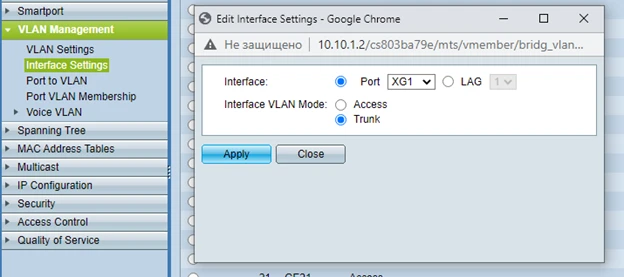
Of course we can't forget about the TRUNK port, in our case the XG1 port. This port will be used for exchange between VLANs and our Cisco RV260 router.
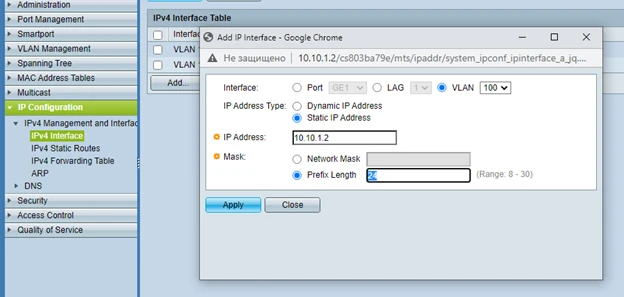
Of course, in order for us to access our switch via our management VLAN (VLAN 100) in the future, we need to assign an IP address on VLAN100 (10.10.1.2)
Configuration check
We have now finished configuring both our router and switch. So it's high time to check our configuration.
- By connecting to port GE3, we should get the address from VLAN10 (192.168.10.0/24)

- When connecting to port GE14, you should get the IP address from VLAN20 (192.168.20.0/24)

As you can see in the pictures, our configuration is correct and devices are getting correct IP addresses in terms of connecting to the correct ports. This concludes our tutorial on basic configuration of Cisco devices. Of course, this is not the end! There are many more configuration options: routing, VPN configuration, VoIP phones and many other features. We invite you to read the next publications.
Authors:
Aliaksandr Roslikau
Leszek Błaszczyk
Authors:
Aliaksandr Roslikau
Leszek Błaszczyk