Contact


Account

Favorite

Cart
Like, share and promote!
HOT SPOT and Facebook
 Click to enlarge!
We should start by explaining what this term means. Well, Hot Spot is a public access point that allows you to access the Internet through a wireless network based on Wi-Fi standards (802.11 a,b,g,n,ac).
The Hot Spot service is mainly addressed to places where we want to make the Internet connection available to our Customers for free or for a fee. By public places we mean e.g.: hotels, guest houses, cafes, restaurants, clubs, shopping malls, offices, stadiums, train stations, petrol stations, etc...
Hot Spots allow owners of laptops, tablets, PDAs, mobile phones and other devices (e.g. GPS receivers) equipped with a WiFi card based on the 802.11 standard, to connect to the network and use the Internet service.
The use of the service is most often free of charge, while the network authorization process itself can be carried out in several ways:
With this solution, we no longer need to secure the network with e.g. an access key (WEP/WPA/WPA/WPA2) or MAC authorization.
It can also happen that the access is free of charge, we do not have to do anything to access the network, but we have a limited range of services available, e.g.: we have access only to the website of some institution providing Hot Spot.
It is also important that the owner of a Hot Spot decides to whom and on what terms he provides the link and whether the link will be provided for payment or on other terms.
What's more... having the right device, apart from the fact that we can control how the link is made available, we can also limit the link speed for individual users.
The basic element of a Hot Spot is the AP (Access Point). It is a device - most often a router - that is connected to another computer network via a wired connection and thanks to it enables the provision of specific services, e.g. access to network resources, providing an Internet connection or services based on VoIP technology.
And we're about to start with this network element - Access Point :)
 Click to enlarge!
As you can see, the device is very aesthetically pleasing and one could say that it is very similar in appearance to the Ubiquiti UniFi series, but it is completely different Access Point.
The backside of this AP looks completely different
 Click to enlarge!
and the most noteworthy is the FIT/FAT switch, which allows for connecting successive devices together in a cascade - which will be described in the following paragraphs.
The showcased Access Point is a very functional device, and thanks to its parameters, it is perfect for a typical Hot Spot.
 Click to enlarge!
The manufacturer has also enabled 2 ways to uniquely connect devices in a cascade.
First way to ensure that 150 users are authorized and cover about 1500 square meters of space, using 3 devices.
 Click to enlarge!
The second way is to connect up to 300 users and cover an area of more than 4,000 square meters, but that requires 7 devices connected together.
 Click to enlarge!
As mentioned earlier, the FIT/FAT switch on the back of the device deserves our attention.
In the FAT mode we set the first/subordinate device to which we can connect the next devices set in the FIT mode. The mode of operation of individual devices is very important, because if we set the slaves to FAT mode, then the cascade connection will not be realized and our network will not meet the expectations.
It is also important that the maximum length of cables between individual devices must not exceed 80m. That is, in the case of the installation shown in Diagram 1, the sum of cable lengths must not exceed 240m.
You need to be aware of the fact that devices power each other, so if you don't keep the right length of wires, then there will be losses, and the devices will not get enough power and will not work.
Okay, let's take a closer look at the product...
By default, the device is assigned the address 10.10.0.1 (in FAT mode), the DHCP server is turned on and the wireless network name is set (described on the bottom of the device). All you have to do is search for the appropriate network, connect to it and you already have access to the AP using a web browser.
 Click to enlarge!
To log in to the device, enter "admin" in the Username and Password fields and a page opens with "Wizard", which helps to quickly configure the basic functions of Access Pointa: we can change the language, the password to access the device, the name of the wireless network and the configuration of the WAN interface.
 Click to enlarge!
Of course it is only a "Wizard", but we also have access to the detailed configuration of individual modules of the device.
The interface is divided in a very clear and intuitive way, which simplifies and optimizes looking through the individual configuration options.
STATUS
 Click to enlarge!
SYSTEM
 Click to enlarge!
 Click to enlarge!
NETWORK
MANAGEMENT
 Click to enlarge!
The Wi-Fi network configuration is also noteworthy. The manufacturer implemented of a very detailed process of configuring wireless network settings:
 Click to enlarge!
After clicking the "Edit" button, a window with all wireless settings appears.
 Click to enlarge!
The multitude of operating modes and the possibility of detailed configuration of the transmitting power of our Access Point is also worth noting.
 Click to enlarge!
As you can see, our Access Point supports many modes of operation, including IEEE 802.11s - instead of a cascade connection, the device can work in MESH topology.
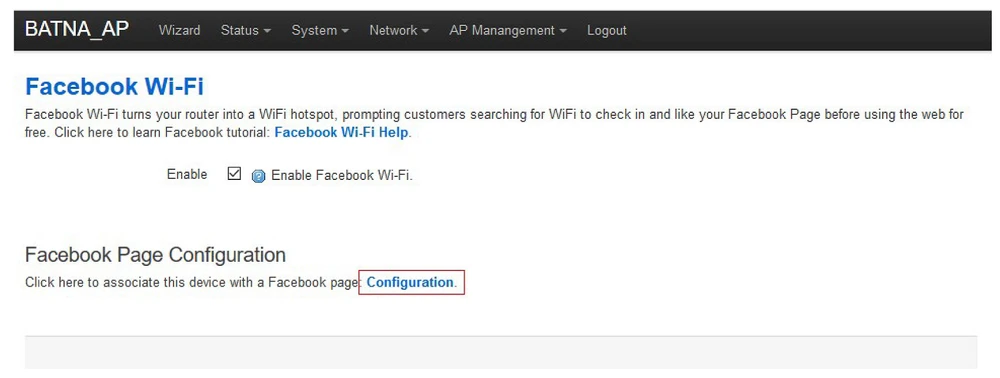
But the most important option of this Access Point is the ability to run a Hot Spot named here as "Facebook WiFi":
 Click to enlarge!
After enabling this option we can configure the Facebook Wi-Fi service.
 Click to enlarge!
- selection of local company website
 Click to enlarge!
- authorization (skip check-in)
in this situation, the person connecting to Hot Spot may skip the option to check in to Facebook.
 Click to enlarge!
- authorization (activation code)
When this option is checked, the person connecting under Hot Spot gets access after entering the authorization code
 Click to enlarge!
- established session time by clients
this option allows you to specify how long the user can use the service
 Click to enlarge!
- Hot Spot terms of use
 Click to enlarge!
After setting all options and clicking "Save settings" we have everything ready.
After connecting to the created wireless network, we are redirected directly to the Facebook page, where we have to "check-in"
or enter the activation code - only if this option is set of course
 Click to enlarge!
 Click to enlarge!
With these steps, we can enjoy surfing the Internet in peace.
The device is very aesthetically pleasing and it takes very little time and is very intuitive to look for any options needed to configure the network to our needs.
And of course, the most important argument in favour of this Access Point is that we can very quickly make a professional Hot Spot.
Additionally, we authorize clients using the "Wi-Fi Facebook" option, which is quite a unique option at the moment, as only a few devices on the market have such a possibility (e.g. NETGEAR R6300, Cisco ISR G2 and ASR 1000 Series, D-LINK DIR865 L/E).
In one word, this device is super sweet and I can wholeheartedly recommend this Access Point to everyone.
 Click to enlarge!
| Polub udostępnij i promuj HOT SPOT i Facebook WiFi.pdf | pobierz |