Unifi Access from Ubiquiti - Configuration and Installation

UniFI Access is a new look from Ubiquiti engineers at the well-known UniFI home security solutions. Access Starter Kit is a group of devices that can be used both in offices and apartments. The kit is compatible with most electric and magnetic locks, as well as with electric strikes. In addition, UniFI Access maintains compatibility for motion detectors, alarms, and other 12V powered access devices. The system itself is controlled by the UniFi Access software which allows to manage the connected users.
Access Starter KIT Click to enlarge!
Access Starter KIT

The UniFI Access Starter Kit consists of:

UniFi Access Reader LITE

UniFI Access Reader Lite is a compact and reliable NFC reader as part of a comprehensive UniFI Access system. The device communicates with other components via a 10/100Mbps Ethernet port that supports Power Over Ethernet (802.3af PoE). The reader itself allows you to control the entering and exiting of employees, you can gain access to the office or certain rooms by using a NFC card. Another advantage of this device is fast and easy installation and its modern NFC security standard (13.56 MHz).
UniFi Access Starter Click to enlarge!
UniFi Access Starter
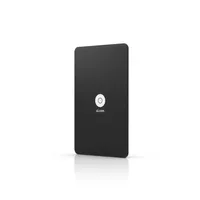
Technical Specification UniFI Access Reader Lite
Weight 65g
Dimensions: 94.91 x 40.00 x 31.10 mm
Mounting Wall
Power supply PoE 802.3af
Maximum energy consumption 6W
Operating temperature From -10 ° to 40 ° C
Alarm Yes

UniFi Access Reader Pro

UniFi Access Reader Pro is a compact and reliable NFC reader equipped with a touch screen with an integrated camera. The device works in FULL HD resolution and the installation itself is simplified by a bracket with a level to mount the device evenly.

Key Benefits:

  • NFC and Bluetooth support
  • IP54 protection
  • Compact design
Unifi Access Starter Kit Click to enlarge!
Unifi Access Starter Kit
Technical specification UniFi Access Reader Pro
Weight 85 g
Dimensions 73.40 x 62.28 x 26.55 mm
Mounting Wall bracket or aluminium clamp
Power supply 802.3af PoE
Maximum energy consumption 8.3W
Operating temperature From -10 ° to 40 ° C

UniFi Access Card

The kit also includes 20 NFC cards for the aforementioned readers. These cards are encrypted with a special algorithm that cannot be replicated. UniFi Access itself can also support other NFC standard cards, so you can keep your existing NFC cards with peace of mind.
Access Starter Kit Click to enlarge!
Access Starter Kit

UniFI Access Hub

UniFI Access Hub (UA-HUB) is the last device included in the set. This product does not work independently, it has to be connected with the Qnap NVR UDM-PRO, which unfortunately has to be purchased separately. UA-HUB has an intuitive browser-based interface allowing simple configuration. To power UnIFI Access HUB and other components of the system you need a 802.3bt PoE source (PoE++). Besides that the device has a 12/1A power connector, three 802.3af PoE ports for UniFI readers. On both sides of the case we can also find connectors for electric locks and sensors. The whole device is made of high quality plastic with a mounting rail.
Unifi Access Starter Kit Click to enlarge!
Unifi Access Starter Kit
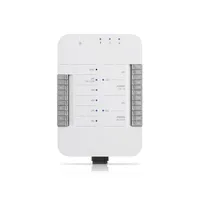
Technical Specification UniFI Access Hub
Weight 457g
Dimensions 190 x 126 x 33 mm
Maximum power consumption 40W 40W
Mounting DIN rail
Power supply 12V
Operating temperature 0 ° to 40 ° C

Connecting and configuring UniFI Access Starter

The set of UniFi Access devices does not work independently. We have extended our package with a UDM-PRO, the high-performance router to which we connect all network devices in the office or apartment. The device acts as the UniFi network controller and monitoring system (NVR) at the same time. UDM-PRO does not have PoE output, so it is obligatory to install another device. In our case, it was the USW-Industrial switch, which will expand the number of available ports.

Connection diagram

In the diagram below you can see the UVC-G3-FLEX camera that is not included in the set. We suggest to extend the set with this camera to increase functionality of the system.
Access starter kit diagram Click to enlarge!
Access starter kit diagram

UniFI Access system configuration

  1. Connect the UA-PRO camera and NFC reader to the UA-HUB port.

    Note: The manufacturer recommends connecting these devices to the UA-HUB before running the configuration wizard on the UDM-PRO access controller.

  2. Connect the UA-HUB to the local network using an Ethernet cable through the "PoE In" port. 3.
  3. Once power is connected go to a web browser and start the configuration from the UDM-PRO.

    Note: Before configuring the UniFI Access Kit system, make sure that the UA-HUB and UDM-PRO are connected to the same local network, and that the UA-PRO and UA-LITE are connected to the UA-HUB.

UDM-PRO configuration

We will start the configuration of the entire UniFI Access system with the UDM-PRO device. The first thing we need to do is create our account in the UI.com ecosystem. We click on the "Create Account" tab, which will take us to the registration site.
UDM Click to enlarge!
UDM
Then fill in the appropriate fields with your data, i.e:
  • E-Mail address
  • First and last name
  • Password
After completion a request will be sent to the specified email to confirm the registration. After successful registration we log on to the device.
UDM 3 Click to enlarge!
UDM 3
In the next step we are asked to set the schedule for updating the system software. We choose a time convenient for us and go on.
udm configuration Click to enlarge!
udm configuration
At this stage, select the configuration based on automatic optimisation "Auto-Optimize". The device will then perform connection performance tests.
UDM Click to enlarge!
UDM
In this tab we get the results of performance tests conducted by the system. Additionally, the device will suggest to set parameters of the WAN link (to the Internet) on the basis of the obtained results. If the results do not conform to the link then the user should correct the values. In the case of error or omission of this step the router may limit maximum speed of Internet access to these values. This is a very important point in configurating the UDM-PRO and its advanced Internet bandwidth management systems.
UDM Click to enlarge!
UDM
Finish the installation with the "Finish" button. At this point, the system will update. After the update, we can proceed to configure the UniFi Access Kit.
UDM Click to enlarge!
UDM

Configuration of UnFI Access

Once you get to the UniFi Access configuration, you will be greeted with a short instructional video. After accepting the privacy policy, we can proceed with the configuration.
Unifi Access Starter Kit Click to enlarge!
Unifi Access Starter Kit

On this page we add or remove elements of our installation, by default we will only see kit elements here.

We located the UA-HUB by the main door, the UA-PRO right next to the UA-HUB. The NFC reader UA-LITE we locate by the exit, we think this is the best placement option. Of course we can change this at any time, and we can do that by pressing on the checkmark on the right next to the UA-LITE or UA-PRO.

In case of extended installations with many UniFi Access Hubs we can locate the devices by selecting the "Locate" function with the mouse. The "Locate" button will cause the devices to beep, revealing their location. For example, the UA-HUB will beep twice and the device will illuminate with a white LED.

Unifi Access Starter Kit Click to enlarge!
Unifi Access Starter Kit
In further configuration we are asked to put a NFC card to the reader. When the task is done correctly, we will be informed by a sound and the card number will appear on the screen.
Click to enlarge!
If you want to add more cards, click "Register Access Cards for More People" and then "Next". Add them one by one by placing them on the reader and describing them properly. It should be mentioned that we have 20 of them in the set, but we can also add a phone which supports NFC or other cards in the same standard to the system.
Unifi Access Starter Kit Click to enlarge!
Unifi Access Starter Kit
Next, we configure a weekly access schedule to the premises with the cards registered in the system. That is, you define at what times a card is active and grants access to the premises.
Unifi Access Starter Kit Click to enlarge!
Unifi Access Starter Kit
At the very end we check if everything we wanted has been properly configured, if so, we finish the installation by selecting "Finish".
Unifi access starter kit Click to enlarge!
Unifi access starter kit

Configuring UniFI Acess

Once the installation is complete, the main panel for controlling the UniFI Access Kit system will open in front of you.

On the left side you will find a menu with a timeline. In the center you will find information about entry and exit attempts. The blue color indicates devices that have received authorization, and the red color represents blockades. If you hover the mouse over a bar you will get a summary.

In the upper right corner we can change the perspective of the timeline. We can divide it by day, week, month or three months. In this tab we also have information about 1 logged person and a total of 25 total entry attempts (on a scale of 2 days). At the very bottom we get the last shots from the webcam while scanning the card.

Configuration of UniFi Access Starter Click to enlarge!
Configuration of UniFi Access Starter
In the "Elements" tab you will find information about registered, connected and running devices at the moment.
Access Starter Kit configuration Click to enlarge!
Access Starter Kit configuration
The "Topology" tab is a graphical representation of the installation and the ability to add new devices.
Topology UniFi Access Click to enlarge!
Topology UniFi Access
The tab "Door Groups" contains data on the number of doors integrated into the system.
Door Groups UniFI Access Click to enlarge!
Door Groups UniFI Access
In the "Users" tab, we can find information about users and add more users. Here we can also assign cards to new and existing users.
Users Access Starter Kit Click to enlarge!
Users Access Starter Kit
In "Policies" we will find information about settings, from this level we can also, for example, change or add an access schedule.
Policies UniFI Acces Starter Click to enlarge!
Policies UniFI Acces Starter
Moving on to the "Visitors" tab we find a list of visits.
Click to enlarge!
In the menu you will also find "Access Logs", this is a dashboard where you can see information about entry and exit attempts and the time they occurred. If necessary, there is also an option to export data in the CSV format.
Acces log UniFi Click to enlarge!
Acces log UniFi

Summary

UniFi Access Starter Kit is a breath of fresh air in the already known solutions. The kit itself is not difficult to configure, and all this is complemented by a clear menu, nice design and compatibility with all devices from the UniFi series. By far the most important advantage is the ability to work with the rest of the UniFI Protect architecture. All of this allows you to create user-friendly systems that support almost all of your office consumer electronics.

FAQ - Questions and Answers

1. Does UniFi Access support IPv6?

No, the system currently only supports IPv4.

2. How do UA cards differ from other NFC cards?

Unlike regular NFC cards, UA cards are more securely encrypted to prevent copying.

3.Can I use one UA-Hub to control multiple doors?

No. One UA-Hub is for one door.

4.Can I connect the UA-Pro and UA-Lite directly to a PoE switch instead of the UA-Hub?

No. Communication between the access readers and the Hub is required.

Session will expire in:
Seconds
You will be logged out after the session expires
Choose a different country or region to shop in the language that suits you
Our site uses cookies (so-called "cookies"). You can find more about these files, as well as about how we process your personal data, in our privacy policy.
You are on page for country / region:
English (EN)
Please select a different country or region to shop in a language that suits you.